
I am regularly hired to clean hacked websites, and that was also the case last week. In most cases I can remove the malware within an hour, but this time we were dealing with extremely persistent malware that kept coming back. In this article, you’ll read what happened and how I eventually managed to solve the problem.
The Symptoms of the Hack
There was nothing visible on the front end of the website, but behind the scenes the infection was very obvious:
- One or more new administrator accounts were created, but they were not always visible in the WordPress Users screen.
- Several new plugins were created, but these were also hidden from the WordPress Plugins screen.
- Additional plugins were created inside the
mu-pluginsdirectory. - A
user.inifile was created in the website’s root directory, which loaded a malware file. - That malware file (along with several others) was located inside the
/wp-contentdirectory. - Malicious code was appended to the bottom of the active theme’s
functions.phpfile. - Malware was injected into WordPress core files and directories.
- Malware was added to files in the website root, including
wp-config.php. - Malicious code was also injected into several inactive themes.
How I Eventually Removed the Malware
Normally I use Wordfence to clean infected websites. Wordfence is a security plugin for WordPress that includes an excellent malware scanner capable of removing infected files with a single click. However, Wordfence requires a reasonable amount of server resources, and many budget hosting providers simply don’t offer enough resources to run it properly.
To make matters worse, this particular malware automatically disabled Wordfence.
So that wasn’t an option in this case. I had to locate and remove the malware manually.
Rather outsource this? Hire me to clean up your site!
Create a Backup First
Before cleaning anything, create a full backup of your website. I usually use UpdraftPlus for this. Make sure you also back up all website files.
Most hosting providers also create daily backups.
If you have a backup from two to four weeks ago, it’s worth restoring that first. With a bit of luck, your website wasn’t infected yet at that point.
Delete and deactivate caching
If you use a caching plugin, or use server caching, you must first completely clear and disable it.
Make Sure Everything Is Up to Date
Hackers often gain access through a vulnerability in a plugin. Recently, there was even a serious vulnerability in WordPress itself. Before doing anything else, make sure everything is fully up to date so the vulnerability that allowed the attacker in has been patched. You can do this by going to Dashboard → Updates in the WordPress admin.
Reinstall WordPress
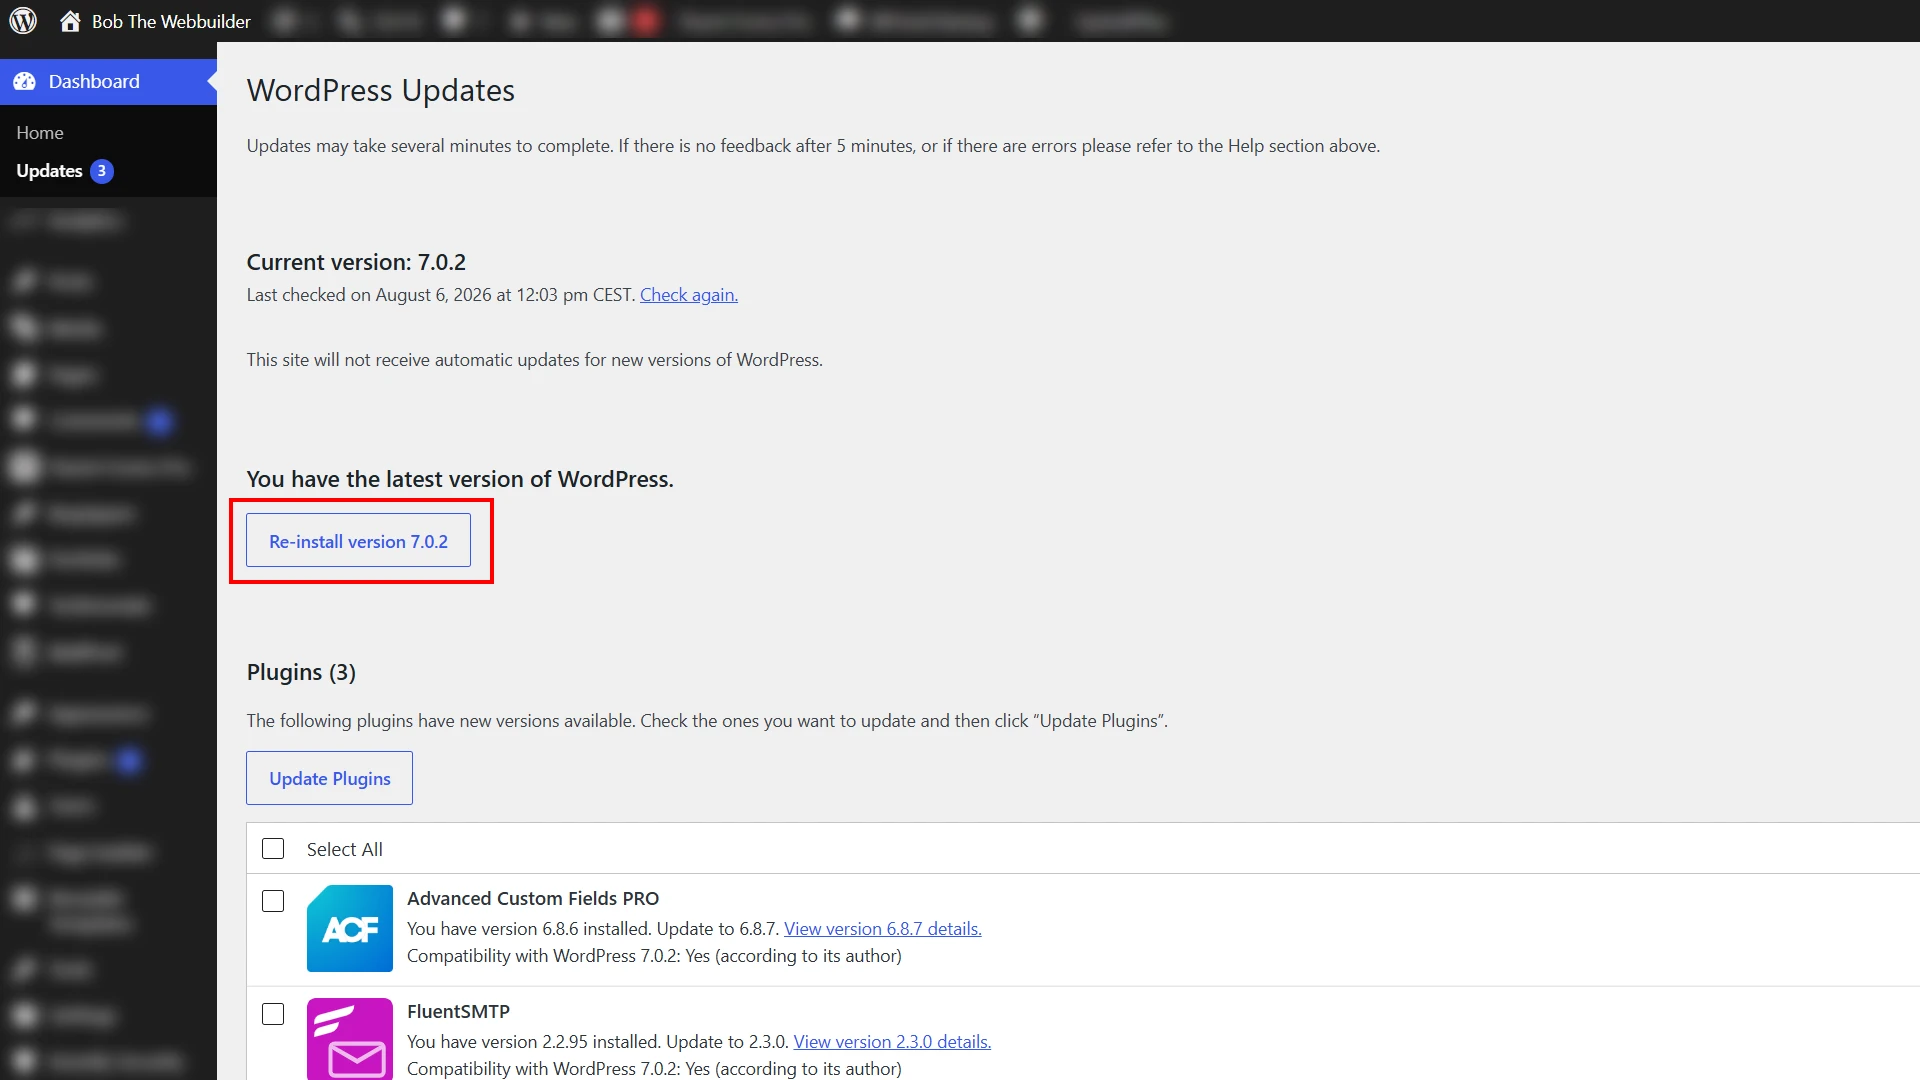
Since several WordPress core files had also been infected with malware, you should reinstall WordPress itself. You can do this from the Updates screen, where you’ll find the button labeled “Reinstall Version X”.
Finding Malware via FTP
Unfortunately, this did not solve all the problems. Although the WordPress core files were now clean again, the /wp-content/ directory is not overwritten during a reinstall because it contains all your plugins and themes. In addition, extra files had been added to the website root (such as the previously mentioned user.ini file), and even wp-config.php had been infected.
To fix this, I had to log in via FTP. FTP allows you to browse your website files much like Windows Explorer, using software such as WinSCP. You’ll need FTP credentials for this, which you can request from your hosting provider. If you don’t have FTP access, you can use a plugin such as WP File Manager, but that’s significantly less convenient and much slower.
Manually removing malware is a highly technical and complicated process.
If you’ve never heard of FTP before, I wouldn’t recommend attempting this yourself.
In that case, you’re better off hiring me to clean your website.
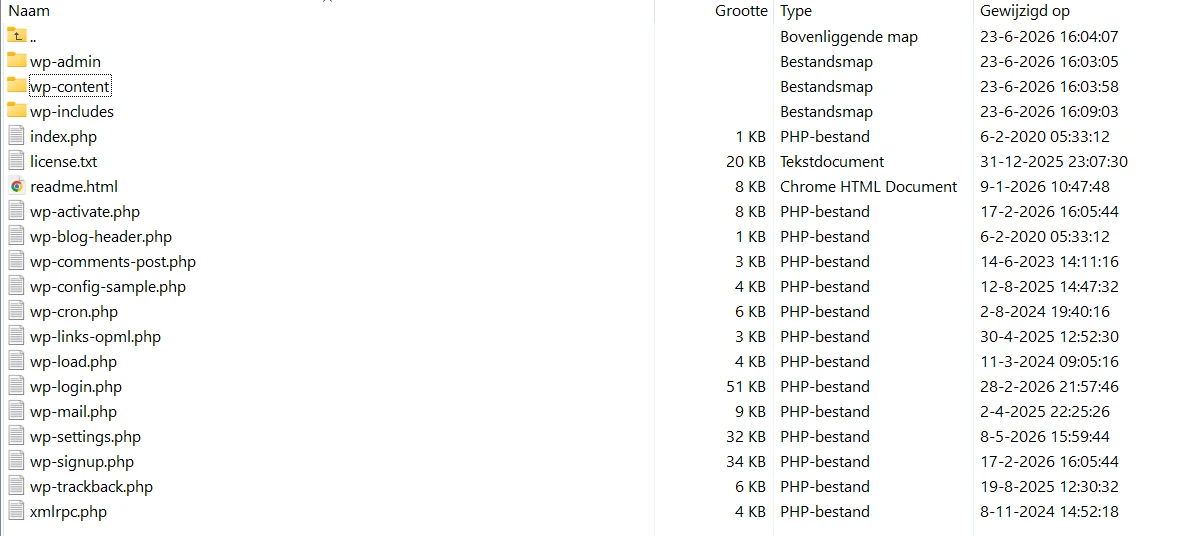
When you log in via FTP, you’ll often end up directly in the website root, although sometimes you’ll first need to open a folder such as your domain name, www, or public_html. You should see folders named wp-admin, wp-content, and wp-includes, just like in the screenshot below.
First, download a clean copy of WordPress from WordPress.org and extract it. Then delete all loose files in the website root (not the folders!), except for wp-config.php. This file contains your database credentials, so you’ll still need it.
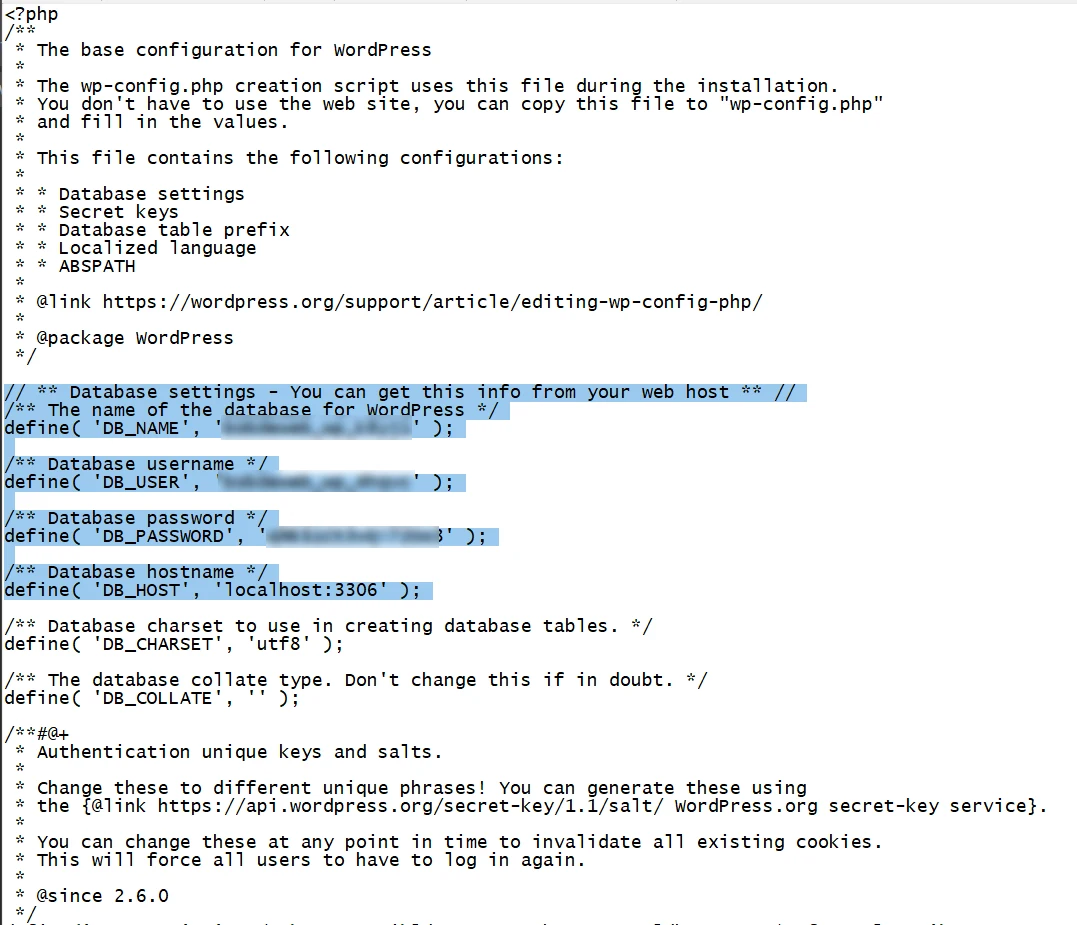
Now upload all files from the root of the clean WordPress installation you just downloaded. Open wp-config.php and copy the highlighted database settings shown in the screenshot below. Paste those into the same location in wp-config-sample.php. Then delete wp-config.php and rename wp-config-sample.php to wp-config.php.
I warned you 😉 Prefer to hire me instead?
Next, navigate to the /wp-content/ directory. Besides a number of folders, this directory should normally contain only a single file: index.php. If you find additional files, that doesn’t necessarily mean they’re malicious. Some plugins legitimately create files such as maintenance.php or advanced-cache.php. However, since malware can also infect these files, it’s safest to delete them—they will be recreated automatically if they’re needed.
index.php should contain only these two lines:
<?php
// Silence is golden.
Next, open the plugins directory. This is where all plugin files are stored. As mentioned earlier, the malicious plugins were hidden from the WordPress admin area, so the only way to find and remove them was through FTP.
Sort the folders by Last Modified. Anything that has been modified recently should be treated as suspicious.
You’ll probably notice several recently modified folders with names that don’t match the plugins listed in your WordPress admin dashboard. Delete these folders. However, be careful: folder names don’t always exactly match the plugin names displayed in WordPress.
Not sure whether a plugin is malicious? Open the folder. Malware plugins often consist of just a single PHP file. Open it and paste its contents into your favorite AI tool. It can usually tell you immediately whether the code is malicious.
Besides the plugins folder, you may also have a mu-plugins directory. Malware is frequently hidden there as well. This folder usually contains individual PHP files rather than subfolders. Open each PHP file and paste its contents into an AI tool to determine whether it’s malicious.
Removing Malware from functions.php
Now navigate to the themes directory (still inside wp-content). Open the folder of your active (parent) theme and then open functions.php. Paste its contents into your favorite AI tool. If it detects malware, ask it to generate a clean version of the file and replace the contents of functions.php with the cleaned code.
Next, go to Appearance → Themes in the WordPress admin area and delete all unused themes (including the default Twenty… themes). In my case, these had also been infected.
Remove Unknown Administrator Accounts
After removing all malware, go to Users in the WordPress admin area. Delete any unknown users with the Administrator role.
Initially these users weren’t visible in the WordPress admin area, but once all malware has been removed they should appear again. To be safe, also check the users table in phpMyAdmin.
Overwrite all plugins and themes
Sometimes malware is also injected into legitimate plugin or theme files. Therefor, it is best to reinstall all your plugins. You can do this by downloading them from WordPress.org (or the plugin developer’s website) and then manually uploading them. You will be asked whether you want to replace the installed plugin — choose yes.
Plugins from WordPress.org can also simply be removed and reinstalled through the Plugins section in the WordPress admin dashboard. In most cases, the plugin settings will remain intact.
A Game of Cat and Mouse
The biggest challenge was that every time someone visited the website, the malicious script was triggered again. All the malware files and administrator accounts I had just removed were immediately recreated.
To prevent this, it may be necessary to temporarily block all traffic to your website. Almost every hosting provider allows you to do this with just a few clicks:
DirectAdmin: Go to Password Protected Directories → Select your website folder → Create a protected directory and add a user.
cPanel: Go to Directory Privacy → Select your website’s root folder (public_html) → Enable password protection and create a username and password.
Your website will now only be accessible to users who know the password (which should only be you).
Good luck!
Leave a Reply